Friday, 9 December 2011
PRODUCTION DAY 12
Me and kieran went out to find a room, we got a light. Then we set up the table with the box on with the light in a certain place so their will not be any shadows. Me and kieran filmed over 1 hour and a half. slowly we move the box around so there would be less jolting. The credits increased in length but their is a lot less jolting. Then we added the film to the computer and added the music. Then we gave the piece to robert to edit into the piece.
Tuesday, 6 December 2011
PRODUCTION DAY 9-11
In these three days we did not have much time for work because of the showings and blogs. (Mainly because we had not much to do) We spent the side time we had planning for our remake for the credits re I edited the mistakes out. We used two of these days of our time to screen our rough cuts/what we had done so far. at this point our story had been finished and we just needed the credits.
Monday, 5 December 2011
PRODUCTION DAY 8
This day Robert and matt looked through the edited credits, that me and Kieran did on friday day and noticed some stuff which we could not see on the camera. They only saw the mistakes when they had put it into the project. E.G many typo's in the text and some of the footage lagged so we decided to go and film the credits when we had a lot time.
Friday, 2 December 2011
Production Day-7 credits
Above I put a stop motion credit sequence that me and Kieran produced through the day, Matt and Robert supervised this work. Me and kieran over time perfects the technique needed for the credit sequence. Robert and matt found everything worked out really well but it took some time and some failed attempts. It took us about 1 hour and 15 minuets to do the above scene.
Thursday, 1 December 2011
Production Day-6 Editing
This day we did not do much because most off the group was not here on this day. So due to a lack of group members we went out and got extra location photos! Robert put in the edited title sequence into our project. here is one of the photos we got.

Tuesday, 29 November 2011
Production Day-5 Filming/Editing
Today robert spent all of today creating our films title. He made it to a very high Quality in Adobe After Effects. It took the group a whole day of lessons to edit this single piece. We started to plan out the credits and decided to do it on final cut express.


Monday, 28 November 2011
Production Day-4 filming session 4

Directly after the shot we rushed back to the room so robert will have lots of time to edit the last of our footage.

Thursday, 24 November 2011
Production Day-3 filming session 3
We went out filming again, we filmed Kieran in his suit. He made faces so we could edit him. we filmed him running down the corridor. we filmed matt falling over in the corridor and in the Forrest. This day was productive for us. We finished the filming that day, and we all began our post production. In the corridor and out side in the forest matt had to keep falling over. When matt fell over we made sure matt would fall over the safest way possible. In our story board, I would have to take the camera and would have to do a shot to go from low to high. I would have to rotate 360 degrees, but I did not have the equipment to do this. So we had to compromised to a tracking shot.


Wednesday, 23 November 2011
Production Day-2 filming session 2
we went out filming again and we filmed the hall way, this session had a lot less work done in it but we were trying to get the perfect shot. We got a tracking shot of matt going out side and seeing himself, he gets sacred and goes back inside. We used the wheel chair and the tripod for this scene, today we shot scenes 11-14. Rob was editing the scenes we shot the previous day we spent filming, this gave us more time on our hands. We spent some of the lesson coming up with some new ideas.


Tuesday, 22 November 2011
Production Day-1 filming session 1
 |
| the dark room |
Monday, 21 November 2011
costume sheets

The image on the left you can see is part of last fridays work. We went aside in one of our lessons to work out what props and costumes we would need. We used the internet to find cheaper alternatives to individual items. our costume sheet shows masks, suits and cloaks for a hooded monster.

Test film footage
Below is some of the test footage when we out with the camera and wheel chair. We went out to see how good is the camera and to get experience using the wheelchair and to get some test shots which we had planned in advance to get. The group went over the shots and saw that the wheel chair gave us cleaner smooth shots than using the dolly.
Location sheets

Location 1
It took some time to get these re-takes we created because we did not get what we had to do. These location sheets are a variety of pictures illustrating locations we will film at. We have as many different photographs as we could get so the camera man will know what environment he will be working in, so that they could plan ahead and know what the locations look like.
location 1 is our forest location, as you can see we took photos of the trees.
location 1 is our forest location, as you can see we took photos of the trees.
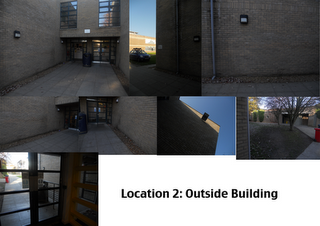

Location 2
This location is found outside the G block, the main character will walk out of the doorway leaving the building. Their also will be a shot facing the wall, we plan to mirror this shot, so the actor will walk back through the same door.
Location 3 & 4
Their will be a variety of shots of the hallway that our monster/demon will be in. It will be a very twisted but straightforward set of shots. We
managed to get the rest of the shots with as little effort as possible.

safety and Film Schedule

We also had to fill out film schedule sheets saying what scene we would get to on that day.
Thursday, 17 November 2011
Story boards

We started the story boards but rob and kieran finished them off because of our exam.I write out the shot info underneath the post-notes drawings. For that day's class I finished and inked our story boards. I did only a few frames in the entire piece.
Tuesday, 15 November 2011
Monday, 7 November 2011
Target audience Member

I had to create an photo collage in photoshop presenting our target audience. This collage will show the activities that they would be interested in and regularly do. They would listen to all kinds of music but mainly hard core music. They would see action films and supernatural films. They would use the internet to listen to music and catch up on TV programs on their laptop.
I used these photos of were to advertise the movie because it will be a twisted paradox(it will be very dark). To make this collage I created a A4 sheet and rotated it 90 degrees, then I added new layers for each image.
My Mood Board

Friday, 4 November 2011

Wednesday, 2 November 2011
"Trapped" initial planning

My initial idea is a man walking down a long corridor, this building is abandoned shut down with the power left on, then he gets into a lift. The lift stops, the man panics, the power dies. His mobile has no signal so he can't call for help. He forces his self to open the lift door, but their was just solid concrete. trapped for ever. But in the end we came up with a trapped idea with a twisted story. A man walks into a room with a box. He puts the box down, he gets locked in. He wakes up on the other side of the door. He walks into the corridor with a hunched hooded figure the light flickers then the hooded figure is standing over him he blacks out. Then suddenly he opens his eyes and he's in a forest. 

Thursday, 29 September 2011
Rosie Ball
Rosie Ball
She has just left Norwich University.
She went to Long Road Sixth Form College 3-4 years ago and is now nominated for a BAFTA Award, for the Ipad game she helped design. She entered a competition for her university along side with 5 other team members to represent the University.

She has just left Norwich University.
She went to Long Road Sixth Form College 3-4 years ago and is now nominated for a BAFTA Award, for the Ipad game she helped design. She entered a competition for her university along side with 5 other team members to represent the University.

Tick Tock Toys won one of three places the competition and is about a robot toy following a track and you have to move the obstacles out of the way.
http://www.rosieball.com/Site/Portfolio/Pages/Dare_2011.html#2 is her main website.
http://www.facebook.com/swallowtailgames/ is the official Game update post for Swallow games on facebook.
This is the trailer for the game.
http://www.rosieball.com/Site/Portfolio/Pages/Dare_2011.html#2 is her main website.
http://www.facebook.com/swallowtailgames/ is the official Game update post for Swallow games on facebook.
This is the trailer for the game.
Saturday, 24 September 2011
Final Cut New York Title Sequence
In friday's session I put my garage band song
into final cut. I found that the song was a bit too long, so
i faded the song out at the end of the video so it fitted perfectly with my video. Then I added my ident at the beging of the video to the start off the sequence. Plus I added titles on the clips I did this by clicking the film icon then going to text and then click on the secound text. Then you drag the control tab to edit the text. Then I
dragged the text box down onto the timeline. Then I used the shorten clip tool and the fade in fade
out tool on the pieces of text to fit properly with the sequence. I then used the tool which looks like a rhombus symbol. This is acherly the motion tool, This tool makes still text or objects to move. After all of
that i uploaded my finished New York sequence to Vimeo. it took a few
minutes too upload the video. I am proud of what i
made.
L2 Alex's New York Sequence from cmdiploma on Vimeo.
L2 Alex's New York Sequence from cmdiploma on Vimeo.
New York Garageband Soundtrack Session
In this session we imported our New York Sequence from final cut into
garage band. We did this so that we could mach the sounds to the certain parts of the short clip. We had to make the
song in garage band. I originally put together a lot of beats and
drum pieces, Then I found it a bit overloaded so it cut it down and added so bass guitar. Then we put the song into final cut with the video and our indent.


New York Final Cut Editing session
This lesson I and every one else were given images of New York, including a
video of the Statue Of Liberty. We had to put the videos together so they would flow into the next video. We all used fades and the splicing tool and other video and photo
transitions. At first I found it fairly easy to use after the presentation from Steve. The lesson went well until for some people their macs shut down.
I am proud of what I have produced.
Thursday, 22 September 2011
garageband demo
We had wednesday 21 to experiment with garageband two make a song.Above is the embedded link from the song i wrote to test Garage Band for the first time. I used preset loops.

In the
above image, The blue bars are the notes for the short piece. I edited these
parts so every note would be more different from anybody elses work.
This is where i got
my original samples from before i had edited them, I would drag a sample into
the track where i wanted it, On the instrument i wanted it on.
In the upper left you
can see a list of my instruments, ranging from a drum loop to an electric piano
(And a synthesizer!)
Sunday, 18 September 2011
Logo Ident Production Session
Two lesson on friday was to put our designs of logos onto
photo shop, using many different layers that contain diffrent images of my
choice. I have added onto my logo effects like brushes, glow and sharpen. I will save them onto the save device, which works like save as but you have to do it layer by layer insted.When I finished saving all the layers I can upload them onto the final
cut pro and add each layer back onto it. Making a little clip.
The most difficult part of photo shop I found was working out how to make a smart object editable.
I'm pleased with how much i have learnt last week and now i will be able to retrace my steps in most parts of each post so I know what I learnt.
The most difficult part of photo shop I found was working out how to make a smart object editable.
I'm pleased with how much i have learnt last week and now i will be able to retrace my steps in most parts of each post so I know what I learnt.
Media Production Company Logo Planning Session
I planned a few different designs for my own personal logo production. I came up with a few names. plus a few ideas from the logos I had been researching. I will use many effects and styles on photoshop to make my logo look professional.
logo research session
When we had the logo research session we came up with two different logo's
of our choice and research about them. Like where they come from, what's the purpose of them, after we had found out these details we had to write the information down on our pail sheets of paper then take
some time drawing these logo's and describing them. I picked proton and ninja tune record company.
Club Flyer Task
The whole class was set a task to make a unique Flyer of our own. We learnt how to start off properly selecting the right size and name. Instead of changing the name when saving and changing the size of the canvas at the end of the editing.
First off i had to plan the information for my club like,
the dates of when the Club is open, the opening times, the name, ticket prices and
the location of the club. After I had done all of this. I started by choosing the saved name, international paper then the size [A5] in this case and
turn it 90* cw to make it landscape. Then we had to set a background image which we could start from, but we had
to chose photos from the flicker website. The image had to fit
the theme of the club. Then we started adding layers so we can come back and edit the file again. We also edited the photo's, after all of this i had
to write the information on the page, I used the design tool to
change the font of the writing and colour so make it stand out.


Saturday, 17 September 2011
Photoshop skill session 1: Earth and eye
On this first skill session we learnt how to;
1-Open a photoshop file so we can have the right size, save file name and lots more.
2-We learnt how to insert an image onto photoshop.
-There are two main ways to do this, on one of them I had to select the picture then press cmd apple + C [copy] and then reselect photoshop then press cmd apple + V [paste].
-I also can drag the photos from the desk top on to one of the layers.
3-The oval marquee tool lets you select an area to delete then if you inverse you will be able to delete the outer part of the picture.
4-The magic wand tool cleans up any left overs which you don't want and it will have to be in the same colour tone.

Monday, 29 August 2011
Production Day-4 Filming/Editing
We went out side to the forest and filmed the last shot for our piece. Matt falling over in the forest.
This shot was an extremely simple shot. I found it hard to film in the forests environment due to the trees. We had Matt fall backwards past a tree. As the camera passes the tree the credits will slide in from the edge. After this shot we went back to the room for robert to edit the last of our footage.

This shot was an extremely simple shot. I found it hard to film in the forests environment due to the trees. We had Matt fall backwards past a tree. As the camera passes the tree the credits will slide in from the edge. After this shot we went back to the room for robert to edit the last of our footage.
Subscribe to:
Comments (Atom)